Changing the Environment Settings
To fine-tune the appearance of your 3D visualisation, you can change the background colour of the viewing area, add a background image and specify lighting effects (these changes will override any settings you defined using the feature but only for this particular project).
Lighting attributes
The Environment Settings refer to lighting for the Scene and for Entities. The former lighting affects the appearance of the inanimate objects in your 3D model, like walls, escalators, kiosks; the latter affects the appearance of Entities.
Each type of lighting has three attributes which approximate the effects of actual light whether emitted by a light source or reflected by an object.
- Ambient – this is light which doesn’t come from a particular source in a scene. In reality, this is the kind of light which has been so scattered and reflected that it cannot be identified as coming from one place.
- Diffuse – this is light which does appear to emanate from one direction but does not reflect sharply. It appears brighter on a surface at right angles to the source than on surfaces at a more oblique angle.
- Specular – this kind of light comes from a well-defined direction and reflects strongly in a particular direction.
The combination of these three types of light can help to create highly realistic 3D scenes. Default settings are automatically in place but you can change the colour of each source of light: do so cautiously and click the ‘Reset to default’ button to restore your original settings.
To change Environment settings
- Select
.
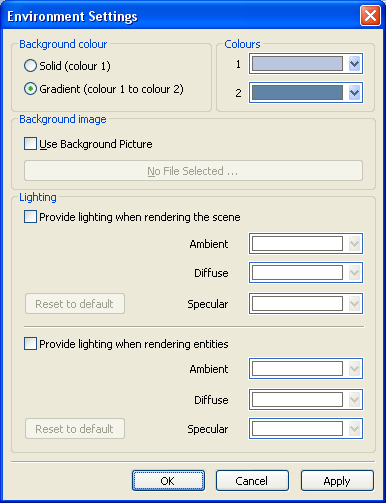
You can choose to have the background as a single ‘Solid’ colour or you can also select a second colour into which the first colour will gradually fade from top to bottom. The combination of these two colours is known as the ’Gradient’.
- Select the Solid (colour 1) option button and choose a colour from the drop-down palette labelled ‘1’.
- To add a second colour for the ‘Gradient’ effect, select the Gradient (colour 1 to colour 2) option button and choose a colour from the drop-down palette labelled ‘2’.
- If you want to load a
graphic file as the background to your visualisation:
- Check the box labelled Use Background Picture.
- Click the No File Selected button to display the ‘Open’ dialog.
- Navigate to the graphic file you want to use, click to select it and then click Open.
If you want to hide the background image, uncheck Use Background Picture.
- To set lighting for the
objects in the scene, check the box labelled Provide lighting when rendering
the scene and select a colour from the associated drop-down palette for each
type of lighting:
To restore these setting to the original defaults, click Reset to default.
- To set lighting for Entities, check the box labelled Provide lighting when rendering entities and repeat step 5.
- Click Apply or OK to save your changes (‘OK’ will close the dialog).